
Have you heard of Symbaloo yet? I learned about it this past school year from our librarian and I love it!!! Symbaloo is a website that allows you to save and organize websites into clickable boxes. You can then email your students the link to the specific Symbaloo for any given assignment/research project. My school librarian and I tested it out twice this year, once for the Gilded Age project and once for the Roaring 20s.
This gave my students a reliable home base for research/sources/databases/etc. Even better, they didn’t lose any of their resources (nor did they keep asking me, “what was that website again?”) during the project because the links were always there in the Symbaloo!


This is a great way for students, especially those learning how to navigate the internet for research purposes, to stick to reliable, or teacher approved, sources. It also keeps reference tools handy such as bibliography formatting reference websites. You can create multiple Symbaloos, each with its own URL, so you can have one for “approved class videos,” “Revolutionary War Battles,” “Reference Sites,” “Political Cartoon Resources,” etc.
You can even make one for yourselves to keep your distance learning and/or personal teaching resources in one spot! This is available for free as a basic account, or you can pay for a premium version. The images referenced here are with the basic free account.
Here’s a step-by-step overview to getting started.
1. Go to www.symbaloo.com and register for an account type of your choice.
2. Click on the plus sign to get started.

Getting started on Symbaloo, step 1
3. Name your “webmix” (website compilation page) whatever you’d like.
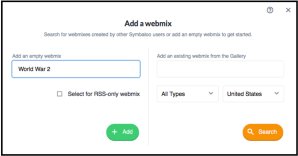
the second step in making a Symbaloo
4. I prefer the black back ground so it’s less distracting for my students, so before I get started I click “settings” at the top and change the background. Click “change background” and choose what you’d like.


5. Next, you can click on any box and start adding websites!
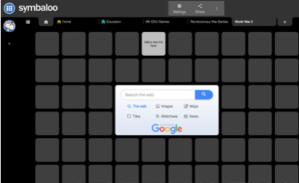
getting started on Symbaloo
6. First click in a box, then click the dropdown arrow next to “create a title,” then you paste the URL you want your students to have access to, then scroll and click save.

3 easy steps to filling a Symbaloo box
7. To make it a bit easier for students, I’d recommend making sure the “show text” box is checked so that the boxes aren’t all just a blank background when students go to your Symbaloo. Then you just keep adding websites until all the ones you want your students to have access to are loaded. You can drag and drop the squares to rearrange them to your liking.

the final steps in creating your Symbaloo
8. It’s worth noting that when you share out your Symbaloo to your students, there is an option to share it to your Google Classroom if you are utilizing that this year.
I hope this is something that you can use this year. It certainly kept my students organized, and it gives me “one stop shopping” for all of my teacher related websites/resources.
If you’d like additional distance learning resources, I have 4 more included in my Back to School Bundle and I anticipate adding more ideas/resources/tips as we go through the year. If you have a tip/resource/idea I’d love to hear about it, you can leave a comment below or email me at stephanieshistorystore@gmail.com.
Good luck as we start this new school year!!!
Categories: Teaching

This is the first time I have heard of Symbaloo, but I think this is good software for conducting online classes. Thank you so much for sharing this.
LikeLike